Enhance Video Quality Online Free With These Easy Fixes

Learn how to enhance video quality online free with our guide to the best tools and quick fixes for TikTok and Instagram videos.
You can easily enhance video quality online for free. A new wave of AI-powered tools lets you upscale resolution, get rid of distracting noise, and fix colours without ever touching complicated, expensive software. Many of these platforms offer one-click fixes that turn grainy or blurry clips into sharp, shareable content that’s ready for social media.
Why Better Video Quality Isn’t Just a “Nice-to-Have” Anymore
Let's be real for a moment: grainy, shaky video just doesn’t fly anymore. In a world where our feeds are flooded with high-definition content, viewer expectations on platforms like TikTok and Instagram have gone through the roof. Your audience is used to seeing polished, professional-looking visuals, and anything less is likely to get scrolled past without a second thought.
This isn't just a hunch; it's a reflection of how we all consume media now. In the UK, adults are spending nearly five hours a day watching TV and video. A massive chunk of that is on super high-quality subscription services. By the end of 2024, it's estimated that 85% of UK households will subscribe to at least one on-demand service, which has trained our eyes to expect a certain standard. This constant exposure to crystal-clear video makes low-quality clips on social media feel jarring and out of place. You can dive deeper into the UK's viewing habits in this market update from S&P Global.
The Psychology Behind a Pretty Picture
When someone stumbles upon a high-quality video, it sends a clear message of professionalism and credibility. A clean, sharp image instantly builds a sense of trust and tells the viewer that the creator is serious about their content. It's a subtle psychological nudge, but it can be the difference between someone watching for three seconds or sticking around for the entire three minutes.
Improving your video's visual appeal has a direct and measurable impact on your engagement:
- Longer Watch Times: It's simple—clearer videos are just more pleasant to watch, so people stick around.
- More Shares: People are far more likely to share content that looks great and makes them look good by association.
- A Stronger Brand: Consistently putting out high-quality video builds a professional brand identity over time.
Great video quality is about more than just looking good; it's a core part of communicating effectively. It shows your audience you respect their time and attention enough to give them a great experience.
Pro-Level Tools for Everyone
Not too long ago, getting these kinds of results meant shelling out for expensive software and having the technical skills to match. Thankfully, that barrier has all but disappeared. The latest AI-powered online tools put professional-grade enhancements within reach for creators at any level. You no longer need a beast of a computer or a film degree to fix common video problems.
These tools are what make this guide possible, helping you achieve immediate, noticeable improvements in your own footage.
Diagnosing Your Video Before You Start Editing
Jumping straight into an online editor without a plan is a recipe for frustration. It's a bit like trying to fix a car without knowing what's actually broken—you end up fiddling with random settings, wasting time, and often making the video look even worse.
The real secret to enhancing your video quality for free is to play detective first. Take a moment to really look at your footage and figure out what the core problems are. This quick pre-flight check doesn't require any fancy tools, just your eyes and a bit of focus. When you know exactly what needs fixing, you can find the right tool and apply the right solution from the get-go.
Spotting Common Video Problems
Most poor-quality videos are plagued by a handful of usual suspects. Think about that clip you filmed at a dim indoor concert—it probably looks grainy and dark, right? Or what about that action shot from your phone that came out a bit blurry and pixelated? Each of these flaws has a name, and more importantly, a fix.
Here’s what you should be looking for:
- Low Resolution: Does the video just look soft or blurry? If the details aren't sharp and crisp, you're likely dealing with low resolution. This is a classic issue when a video is stretched to fit a bigger screen or was shot on an older phone.
- Compression Artefacts: Look closely at scenes with a lot of movement. Do you see strange, blocky, or mosaic-like patterns? That's a tell-tale sign of heavy compression, which often happens to videos downloaded from social media platforms.
- Digital Noise: This looks like a grainy, static-like texture all over your footage, and it's most obvious in the darker parts of the shot. It’s usually the result of shooting in low light, where the camera's sensor struggles to pull in enough information.
- Poor Colour Balance: Are the colours off? Maybe everything has a weird yellow or blue tint, or the scene just looks dull and washed out. This typically means the camera’s white balance wasn't set correctly for the lighting conditions.
Taking a moment to properly assess your footage is honestly the most important step. If you can see you're dealing with digital noise from a low-light shot, you'll know to look for a 'denoiser' tool, not an upscaler. Diagnosis dictates the treatment.
Creating Your Enhancement Plan
Once you’ve put a name to the problems, you can map out a quick plan of attack. For instance, if your video is both grainy (digital noise) and a bit blurry (low resolution), your plan is simple: find a tool to reduce the noise first, and then look for a feature to upscale the resolution.
Knowing what you need makes it so much easier to sift through all the free online options out there.
Many online platforms are built to tackle these specific issues, but it's rare to find one that does everything perfectly. A tool that’s amazing at AI upscaling might have weak colour correction features. Having a clear diagnostic checklist helps you pick the right instrument for your specific surgical fix. And don't worry about data collection; you can always review the privacy policy of any tool you're thinking of using.
A Practical Workflow for Enhancing Your Videos
Right, you’ve diagnosed your footage and have a good idea of what needs fixing. Now for the fun part: bringing your video to life. The key to getting great results without pulling your hair out is following a sensible workflow.
Think of it like decorating a room – you wouldn't hang pictures before you've painted the walls. It’s the same with video. Applying enhancements in the right order is crucial. For instance, if you sharpen a grainy video before you’ve dealt with the noise, you’ll just end up sharpening the grain, making it look even worse. This methodical approach is what separates a quick fix from a genuine improvement.
This simple diagnostic process shows how to identify the core issues in your footage, from resolution to colour, so you can choose the right tool for the job.
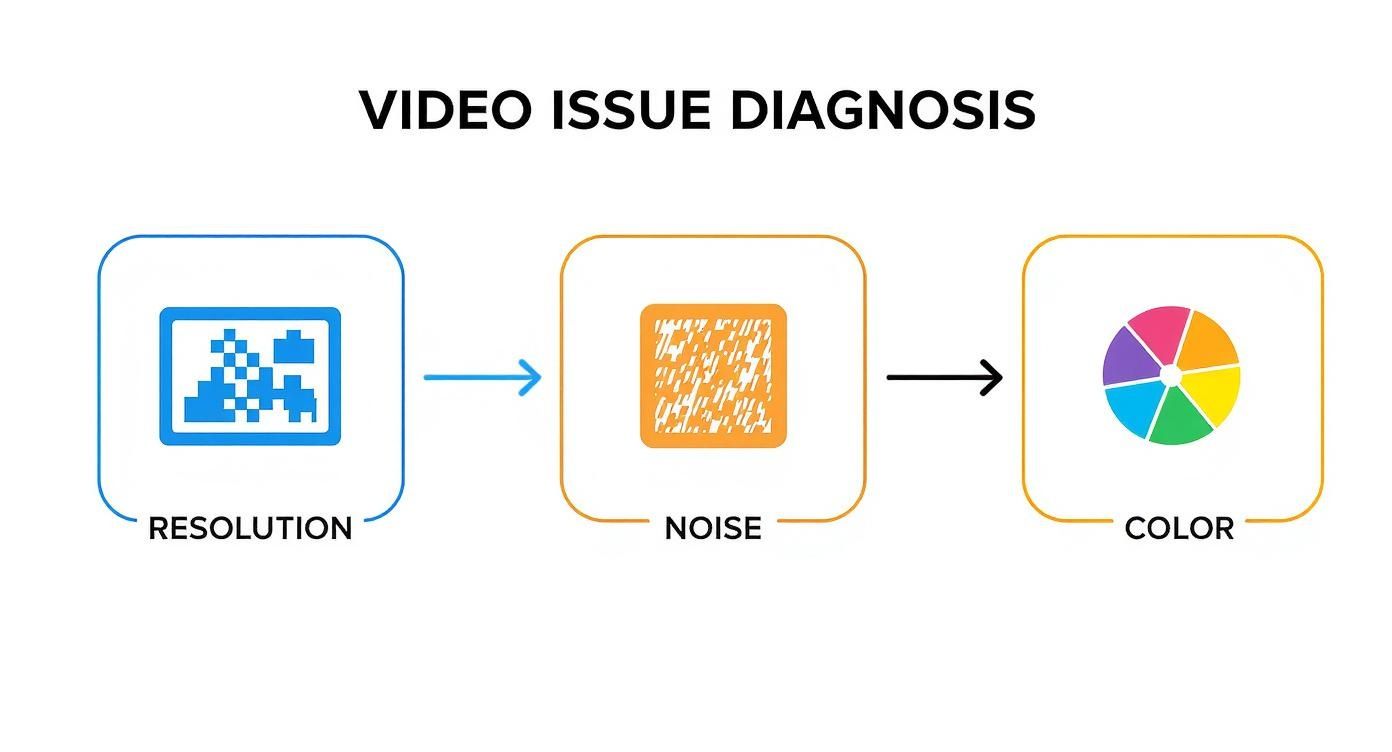
The main takeaway here is that most video problems fall into these three buckets. This makes it much easier to pick an online tool that’s built for the specific job you need to do.
Tackling Blurriness with AI Upscaling and Sharpening
If your footage is blurry or a bit low-res, your first port of call should almost always be AI upscaling. Modern online tools are incredibly clever, using artificial intelligence to bump up your video’s resolution – often from 720p or 1080p to a clean 4K.
The best part? They do it without that horrible, over-sharpened look we used to get. Instead of just stretching out the pixels, today's AI genuinely reconstructs missing details, giving you a much more natural finish. A good tool will also apply just the right amount of sharpening to make textures pop without looking crunchy.
Cleaning Up Pesky Digital Noise
Was your video shot in low light? Then you're probably all too familiar with digital noise or grain. That speckled, fuzzy texture can be really distracting, but thankfully, it’s a problem that’s easily solved these days.
AI-powered denoisers have been trained on thousands of hours of footage. They’re smart enough to tell the difference between actual detail in your shot and the unwanted noise, smoothing out the mess while keeping your image sharp. Always apply noise reduction after upscaling but before you touch any of the colours. This gives you a clean base to work from.
Pro Tip: Go easy on the noise reduction. It can be tempting to crank the slider all the way up, but this often leads to a waxy, plastic-looking image. Start on a low or medium setting. You can always increase it if the grain is still a major problem.
The Final Polish: Fine-Tuning Colour and Audio
Once the main structural problems are fixed, it's time to focus on the look and feel. This is where you can really make your video stand out.
- Colour Correction: This is all about fixing issues. You might need to brighten up a dark scene, add a bit of contrast to stop it from looking flat, or correct the white balance to get rid of an odd colour cast (like that yellowy glow from indoor lighting).
- Colour Grading: Now for the creative bit. This is where you define the mood. You could boost the saturation to make the colours more vibrant for a TikTok clip, or maybe apply a subtle teal-and-orange filter for a more cinematic vibe.
- Audio Clean-up: Don't neglect your sound! A surprising number of free online enhancers now offer basic audio tools. You can often remove background hiss, balance out the volume so you don’t have any sudden loud moments, and even make dialogue a bit clearer.
Getting both the visuals and the audio right is what turns a decent clip into a fantastic one. Viewers have high standards these days. Consider this: between 2015 and 2024, the use of on-demand video services in UK households rocketed by around 240%. People are simply used to seeing high-quality content, making these final enhancement steps more vital than ever. You can dig into more of the data on UK streaming trends on Uswitch.com.
The Best Free Online Tools for Video Enhancement
Let’s be honest, wading through the endless options for online video editors can feel like a full-time job. To save you from that headache, I’ve spent some time testing a bunch of them to find the ones that actually deliver on the promise to enhance video quality online free. Think of this as my personal shortlist of the tools that really work.
We'll focus on platforms that give you noticeable results without a ridiculous learning curve or nasty hidden fees. That said, it's wise to manage your expectations. Most free services have some kind of catch, whether it's a watermark, a queue for processing, or limits on how big your file can be. Always have a quick look at the terms before you dive in.
CapCut: A Solid All-Rounder
There’s a reason you see the CapCut logo everywhere on TikTok and Instagram. It’s a powerhouse of features packed into an interface that’s genuinely easy to use, and—best of all—it’s actually free. While the mobile and desktop apps are fantastic, the online version holds its own for quick touch-ups.
- Standout Feature: The one-click AI Video Upscaler. I've been seriously impressed by how well it sharpens up slightly blurry footage, easily bumping a 720p clip to 1080p or even 4K.
- Best For: Social media creators who need to do everything at once – upscale a video, add some trendy effects, and tweak the colours, all without leaving their browser.
- Heads-Up: The online version can sometimes lag a bit compared to the desktop app, particularly if you’re working with a hefty video file.
Veed.io: Best for Quick Fixes and Subtitles
Veed.io is another brilliant browser-based tool that makes enhancing video incredibly simple. I really like its clean, uncluttered layout; you can find exactly what you need without getting lost in a sea of confusing menus. It’s especially good for more than just visual improvements.
- Standout Feature: The "Clean Audio" button is an absolute game-changer. One click, and it magically strips out background hums, pops, and other distracting noises. It's a lifesaver for making your audio sound crisp and professional.
- Best For: Anyone making content where the sound matters as much as the picture. Think tutorials, interviews, or any talking-head style videos.
- Heads-Up: The free plan slaps a fairly noticeable watermark on your final video, which could be a deal-breaker depending on your project.
One thing I’ve learned from years of editing is that the best enhancements come from targeted, specific fixes. Don't just throw a bunch of filters at your footage and hope for the best. Figure out the core issue—is it grainy, blurry, or just dull-looking?—and pick the tool that's best at solving that one problem.
Clipchamp: The User-Friendly Option
Since being acquired by Microsoft, Clipchamp has become a really polished and dependable choice. It feels incredibly stable to use and is a fantastic starting point for anyone who finds other editors a bit intimidating.
- Standout Feature: Its timeline is super intuitive. The simple sliders for adjusting brightness, contrast, and saturation make basic colour correction feel less like a technical chore and more like a creative one.
- Best For: Bringing old family videos back to life or just making simple improvements to your footage without needing fancy AI-powered tools.
- Heads-Up: On the free plan, you're limited to a 1080p export. Some of the cooler stock media and advanced filters are also locked behind the paid version.
For more hands-on tips and my thoughts on other tools to keep your videos looking sharp, you might want to check out some of the other guides on the SoReel blog. Ultimately, every tool has its own vibe, so give a couple of these a try and see which one clicks for you.
Getting Your Export Settings Right for Social Media
You’ve spent all this time cleaning up and enhancing your footage. Don't fall at the final hurdle. The way you export your video can either preserve all that hard work or completely undo it. It’s a step where so many creators go wrong, and it’s usually because of one common misconception.
We’re often taught that a bigger file means better quality. While that’s true in a professional editing suite, it’s the opposite for social media. Platforms like TikTok and Instagram have to manage millions of uploads, so they run everything through their own aggressive compression algorithms.
If you upload a massive, super-high-quality file, their system will squash it down mercilessly to save space. The result? Those dreaded blocky artefacts and a noticeable loss of sharpness. The trick is to give them a file that's already perfectly optimised. This forces their algorithms to do less work, which ultimately keeps your video looking crisp and clear.
This isn’t just a niche concern for creators. The entire UK video streaming market, which hit an estimated £13.99 billion in 2024, is built on delivering high-quality video as efficiently as possible. With live streaming making up over 76% of that figure, it's clear that audiences expect flawless playback. You can dive deeper into these numbers and discover more about the expanding streaming market on Evoca.tv.
What Do These Export Settings Actually Mean?
To get this right, you only need to grasp a few key terms. You don't need a degree in video engineering, I promise. Just focus on these three settings, which you'll find in almost any online video tool.
Resolution: This is simply the size of your video, measured in pixels. For the vertical videos that dominate TikTok and Instagram, 1080x1920 pixels is the sweet spot. You might be tempted to export in 4K, but the platforms will just downscale it anyway, often with heavy compression.
Frame Rate (FPS): This is how many individual images, or frames, are shown every second. Most phones film at 30 FPS, so it's best to stick with that. If your export frame rate doesn't match your source footage, you can get a nasty, stuttering effect.
Bitrate: This is the big one. Bitrate controls how much data is used for each second of your video. If the bitrate is too high, the platform will crush it. If it's too low, your video will look pixelated before you even upload it. Finding the right balance is key.
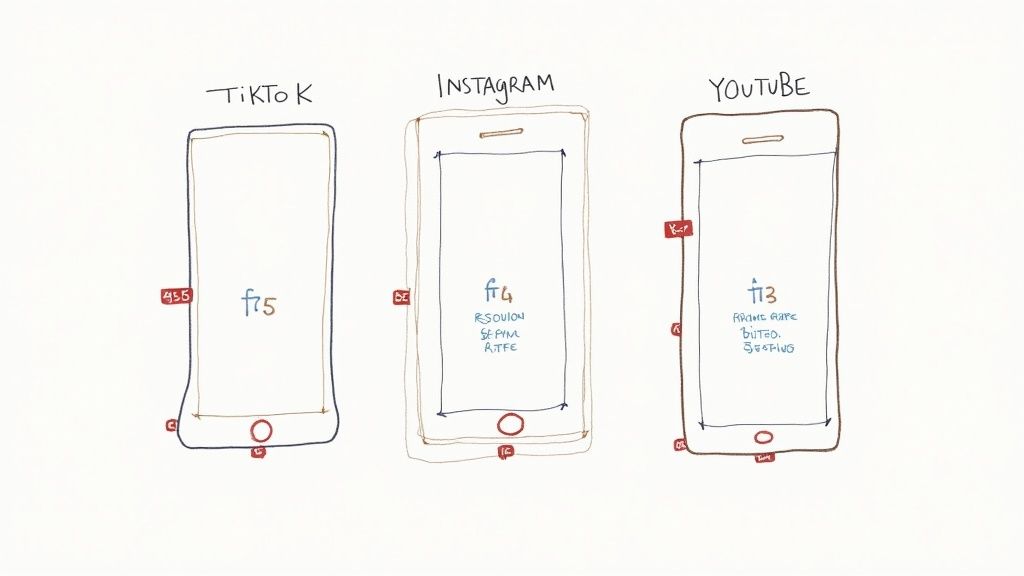
Recommended Export Settings for Social Platforms
To save you the guesswork, I've put together this simple table with the ideal export settings for the most popular platforms. These numbers are a fantastic starting point and will help you avoid the worst of the social media compression beast.
| Platform | Resolution | Frame Rate (FPS) | Recommended Bitrate |
|---|---|---|---|
| TikTok | 1080 x 1920 | 30 FPS | 8 - 12 Mbps |
| Instagram Reels | 1080 x 1920 | 30 FPS | 10 - 15 Mbps |
| YouTube Shorts | 1080 x 1920 | 30 FPS | 10 - 16 Mbps |
Sticking to these recommendations ensures you're giving each platform a file that's much closer to their final delivery spec, which means your video stands the best chance of looking great.
A Quick Tip From Experience: If your online tool gives you the option, always choose a VBR (Variable Bitrate) setting instead of CBR (Constant Bitrate). VBR is much smarter; it allocates more data to complex, fast-moving parts of your video and less to simple, static shots. This results in a more efficient file that looks better overall.
Common Questions About Enhancing Videos Online
Jumping into free online video enhancers for the first time usually sparks a few questions. It’s totally normal to wonder what these tools can actually pull off, especially when they’re promising pro-level results without asking for your credit card details. Let’s clear up some of the most common queries so you can get started with confidence.
Can Free Tools Actually Make a Real Difference?
This is the big one, isn't it? And the answer is a definite yes. The best platforms that let you enhance video quality online free are now packed with powerful AI to handle things like upscaling, noise reduction, and stabilisation.
For social media content, the change can be night and day. A pretty good clip can become a properly polished video that stops the scroll. The secret is to give it the best quality footage you have to begin with and to pick a tool that’s built to fix your specific problem.
What’s the Deal with Watermarks?
Ah, the dreaded watermark. Will a free tool slap its logo right across your finished video?
- It really depends on the service. Many free enhancers do add a watermark; it's the trade-off for not paying.
- Some are more flexible. You might find tools that offer watermark-free exports in standard definition or give you a few free goes before asking you to subscribe.
- Always, always check the export options first. A quick look before you start editing can save you a whole lot of frustration later on.
Why Does My Enhanced Video Still Look Blurry on Social Media?
This one drives creators mad. You’ve put in the work, the preview looks fantastic, but when you upload it to Instagram or TikTok, it’s a blurry mess. This is almost always down to the platform’s own heavy-handed compression.
If you export a video with a massive bitrate, the social media platform will crush it down to size, and your quality will vanish along with it.
The trick is to give the platform a file that’s already prepped for its system. When you use the right export settings for that specific platform, you force it to do less compression work, which helps keep the detail and clarity you worked so hard to get.
Can I Really Improve Videos from an Old Phone?
Absolutely. In fact, this is one of the best things to use these tools for. AI upscalers are smart enough to increase the resolution of old 720p or even 480p videos, making them look so much better on today’s high-res screens.
The denoise features are also fantastic for cleaning up that grainy look you often get from older phone cameras, especially in low light. It won’t magically look like it was filmed on the latest iPhone, but the difference is often huge. If you have more technical questions, it's always worth checking out an online tool's FAQ page for extra details.
Ready to transform your footage with just one click? SoReel uses advanced AI to upscale resolution, remove noise, and deliver crystal-clear results, ensuring your content always looks its best. Try it now at https://soreel.app.