How to Change Resolution of a Video for Perfect Playback

Learn how to change resolution of a video on any device. Our guide covers desktop software, online tools, and AI upscaling to get sharper, clearer clips.
Changing a video's resolution means using software to adjust its pixel dimensions. You're either downscaling it (making it smaller) or upscaling it (making it bigger), which affects both its file size and how sharp it looks. The most common reasons are practical: to shrink the file size for quicker uploads or to fit the specific format of a platform, like Instagram's 1080x1920 for Stories.
Why and When Should You Change a Video's Resolution?
Knowing how to change a video's resolution is one thing, but knowing when and why is what really makes a difference. This decision impacts everything from how long it takes to upload your file to the viewing experience of your audience. After all, you wouldn't try to email a massive 4K film file, and you wouldn't upload a fuzzy, low-quality clip to a platform that's built for crisp HD.
Different situations call for different resolutions. Downscaling a high-resolution video, for example, is often about practicality.
- Fitting Social Media: Platforms like Instagram and TikTok are designed for vertical video, usually at 1080x1920 pixels. If you upload a standard widescreen video, it'll either get awkwardly cropped or squashed down, which never looks good.
- Making Files Shareable: A big video file can take forever to upload or send. Dropping the resolution from 4K down to 1080p can slash the file size, making it perfect for sending as an email attachment or sharing quickly via messaging apps.
- Ensuring Smooth Playback: Not everyone is watching on a high-end device. Downscaling your video ensures it plays without frustrating buffering on older smartphones, tablets, or computers that can't handle ultra-high resolutions.
Think of it like this—your video's final destination should guide your choice.
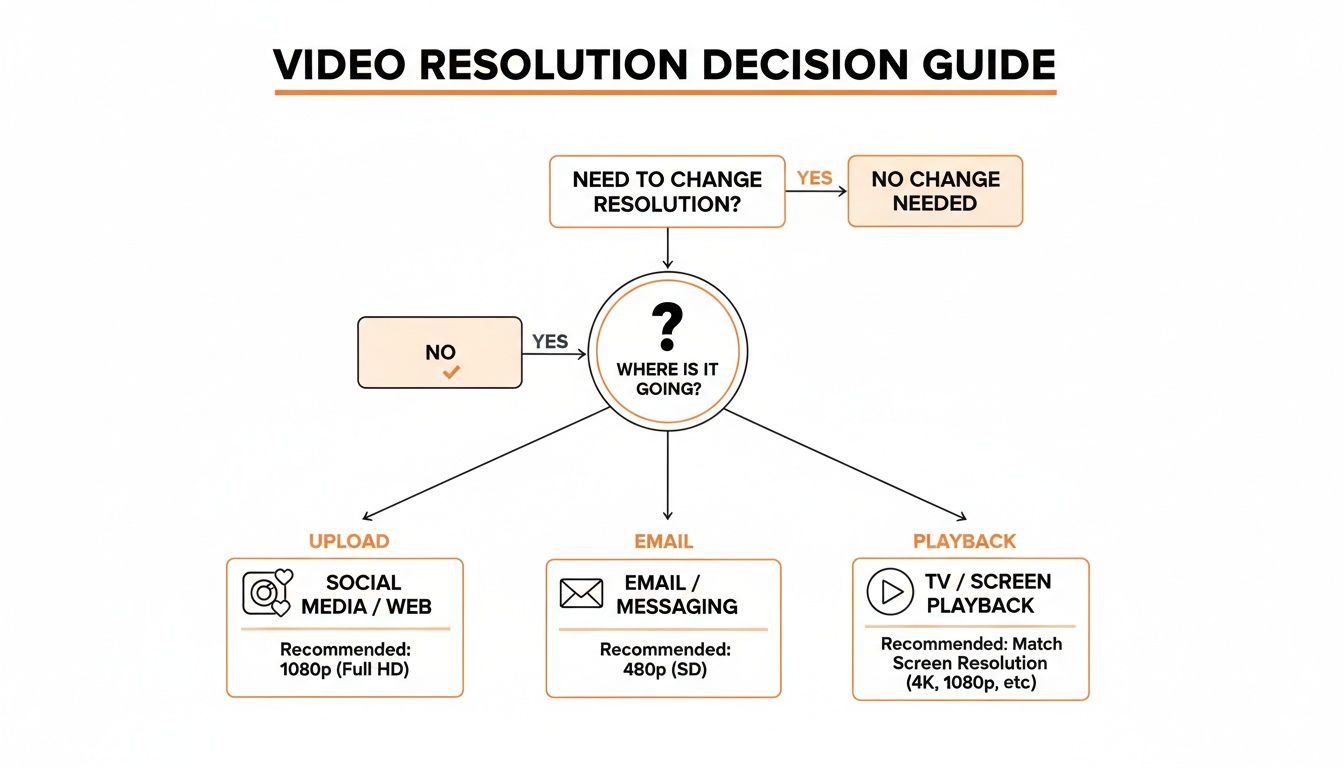
As the flowchart shows, where your video is going—be it social media, an email, or just general playback—is the biggest factor in deciding which resolution to pick.
Keeping Up With Modern Screens
The need to constantly adjust video resolution is really a reflection of how our screens have changed. Back in the early 2000s, most people in the UK were using a 1024x768 screen; it held over 50% of the market share before 2007. Jump to today, and 1920x1080 is the most common, but we also see a huge rise in mobile resolutions like 390x844. It's no surprise when you consider that 68% of UK households are now streaming SVoD content, often on phones. You can see more on UK screen resolution trends here.
To make this easier, here’s a quick-reference table to help you match your video's resolution to its purpose.
Common Resolutions and Their Best Use Cases
| Resolution (e.g., 4K, 1080p) | Pixel Dimensions | Best For | Typical File Size Impact |
|---|---|---|---|
| 4K (UHD) | 3840 x 2160 | High-end displays, professional projects, cinema, future-proofing content | Very Large |
| 1080p (Full HD) | 1920 x 1080 | The standard for YouTube, Vimeo, web streaming, and most modern screens | Large |
| 720p (HD) | 1280 x 720 | Good for mobile viewing, social media, and when internet speed is a concern | Medium |
| 480p (SD) | 854 x 480 | Email attachments, basic previews, and very low-bandwidth situations | Small |
| Vertical HD (Stories) | 1080 x 1920 | Instagram Stories, Reels, TikTok, and YouTube Shorts | Large (but optimised for mobile) |
Choosing the right setting from this table will give you a great starting point for your export.
The core trade-off is simple: Higher resolution means better quality but a larger file. Lower resolution means a smaller file but a loss in detail. Your goal is to find the sweet spot that best serves your purpose without sacrificing too much visual quality.
Taking Full Control with Desktop Software
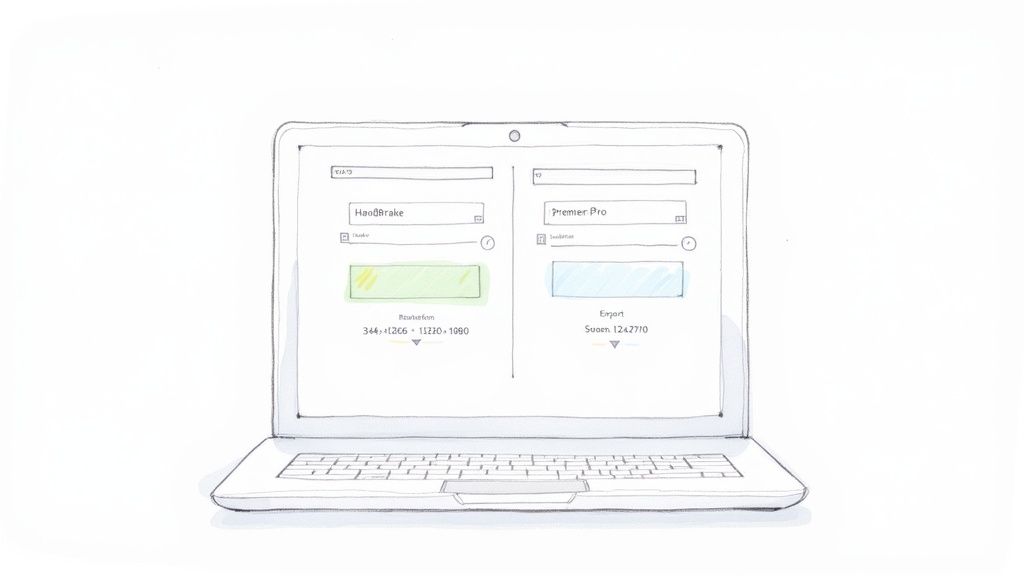
When you need serious precision for changing a video's resolution, nothing beats dedicated desktop software. Online tools are great for a quick fix, but applications like HandBrake and Adobe Premiere Pro give you granular control over every aspect of the final video. They put you in the director's chair.
This level of control is crucial for any kind of professional work. Say you’ve just finished a beautiful marketing video shot in 4K, but the client needs a 1080p version for their website. You can't just shrink it and hope for the best; you have to carefully manage the bitrate and encoding to avoid nasty compression artefacts. This is where desktop apps really shine.
HandBrake: Powerful and Free Conversions for Everyone
HandBrake is a phenomenal free tool that’s perfect for resizing videos without getting bogged down in technical jargon. It’s my personal go-to for quick, straightforward jobs, like shrinking a massive screen recording before I send it over email.
Once you open your video in HandBrake, everything you need is right there. Just pop over to the "Dimensions" tab. You can manually type in the exact width and height you need, like 1920 for width and 1080 for height. What’s even better is its huge library of presets. Need a video for an Apple TV or YouTube? Just pick a preset like "Fast 1080p30," and it handles all the complicated settings for you.
Here's a pro tip for using HandBrake: keep an eye on the "Constant Quality" slider in the "Video" tab. For the common H.264 codec, a lower number (around RF 20-22) gives you better quality but a bigger file. A higher number does the opposite. It’s all about finding that sweet spot, so doing a quick test export is always a smart move.
Premiere Pro: Professional Resizing in Your Editing Workflow
For those of us already editing in Adobe Premiere Pro, changing the resolution is a seamless part of the process. You can do this when you first set up a sequence, but most of the time, you'll handle it during the final export. Let’s imagine you’ve just edited a vertical TikTok video and now need to create a widescreen version for YouTube.
Here’s how you’d do it at the export stage:
- Bring up the Export dialogue: With your edit finalised, head to
File > Export > Media. - Pick your format: H.264 is almost always the right choice for web video. It’s the industry standard for a reason.
- Tweak the resolution: In the "Video" tab, find the resolution dimensions and uncheck the box next to them. This unlocks the fields so you can type in your new values—for instance, changing 1080x1920 to 1920x1080.
- Dial in your bitrate: When scaling a video down, using a VBR (Variable Bitrate), 2 Pass setting is a great technique. It intelligently gives more data to complex, fast-moving parts of your video, which really helps maintain quality.
This hands-on approach gives you complete authority over the finished product. While these tools offer incredible control, some tasks like AI upscaling or removing watermarks are better handled by specialised platforms. For example, you can download SoReel to see how AI tackles video enhancement.
Quick Ways to Change Video Resolution: Online and Command-Line Tools
Sometimes you just need to change a video's resolution fast, without the hassle of opening a big piece of editing software. For those moments, online converters and command-line tools are fantastic, lightweight options that get the job done quickly.
Online video resizers are the definition of convenient. Just upload your clip, pick a new resolution like 1080p or 720p, and download the finished file. They're ideal for small, one-off jobs where installing an application feels like a waste of time.
But that convenience can come with a catch. Uploading sensitive footage to a random website might be a privacy concern. Plus, many free services will slap a watermark on your video or cap your file size. It's always a good idea to check the terms before you upload.
The Power of the Command Line with FFmpeg
If you don't mind a more technical approach, FFmpeg is an incredibly powerful open-source tool. It works directly from the command line, giving you a level of speed and control that graphical interfaces often can't match, especially when you need to automate your workflow.
Instead of clicking through menus, you can resize a video with a single line of text. This is a game-changer for batch processing – imagine converting a whole folder of videos with just one command.
Why FFmpeg is a Go-To for Pros: Once you get the hang of the basic syntax, you can perform complex video tasks in seconds. It’s the engine running under the bonnet of many popular video apps, and learning it yourself is a huge time-saver for any repetitive work.
Here’s a simple command you can copy and paste to get started. This tells FFmpeg to take your input file and scale it to a width of 1280 pixels, automatically calculating the height to keep the aspect ratio intact.
ffmpeg -i input.mp4 -vf scale=1280:-1 output.mp4
That single line does what takes several clicks in a typical app, showcasing the pure efficiency of the command line. For more advanced tips and tricks, we cover all sorts of video processing techniques over on the SoReel blog.
What About Upscaling? A Look at AI Video Enhancement
While shrinking a video’s resolution is pretty simple, going the other way has always been a real headache. For years, upscaling meant just stretching the existing pixels over a larger frame. The result? A blurry, blocky mess that looked worse than the original.
This is where AI is completely rewriting the rules.
Instead of just making pixels bigger, modern AI algorithms analyse your footage frame by frame. They then intelligently predict and generate entirely new pixels to fill in the gaps, effectively rebuilding the video at a higher resolution with detail that wasn't there before. The difference is night and day; you get a sharp, clean image that traditional software just can't match.
How Does It Work in the Real World?
I like to think of it like a skilled artist restoring a faded painting. They don't just photograph it and blow it up; they use their expertise to painstakingly recreate missing details and colours. AI does something very similar for your video, using its training on millions of images to make remarkably accurate guesses about what those missing pixels should be.
This opens up some incredible possibilities for everyday creators and archivists alike.
- Saving Old Footage: You can finally breathe new life into grainy home movies from the 90s, turning them into crisp clips that look fantastic on a modern 4K screen.
- Fixing Low-Quality Sources: It’s a lifesaver for cleaning up footage shot on an old smartphone or rescuing a project that was accidentally exported at the wrong resolution.
- Prepping for Big Screens: AI upscaling lets you adapt standard-definition content for flawless playback on large, high-resolution TVs and monitors.
The core idea is that AI adds genuine detail instead of just enlarging pixels. It's a game-changer for anyone looking to rescue old footage or prepare standard-definition video for a high-definition world.
This process is fundamentally different from just trying to change the resolution of a video in your export settings. It’s a true enhancement, often delivering a final file that looks better than the source ever did. Tools like SoReel are making this powerful technology easy for anyone to use.
Pro Tips for Preserving Video Quality
Changing a video’s resolution isn’t just about typing in new numbers. It’s a delicate balance that can make or break your final product. Get it wrong, and you’re left with distracting artefacts or a blurry mess where a crisp video used to be.
The golden rule? Always start with the highest-quality source file you can get your hands on.
You simply can't create detail that wasn't captured in the first place. That’s why downscaling a 4K file to 1080p will always look better than trying to force a 720p clip to a higher resolution. A good way to think about it is to treat your video's bitrate as its data budget—a higher resolution needs a bigger budget to maintain clarity.

Choose Your Codec Wisely
The codec you pick for your export is critical. For most online content, H.264 is the go-to standard, hitting that sweet spot between quality and file size. But if you have the option, and your target platform supports it, look at H.265 (HEVC). It can deliver comparable quality at a much smaller file size, making it a brilliant choice for 4K videos.
Think about it from the viewer's perspective. With the average UK viewer clocking 271 minutes of screen time daily, smooth playback is non-negotiable. Mismatched resolutions are a huge cause of buffering. Just resizing a 4K video to 1080p can slash load times by 40%, a noticeable difference on the UK's median 70Mbps broadband.
It's no surprise that major streaming services, now in 66% of UK households, automatically adjust video resolutions to suit different devices. This kind of optimisation is key. You can find more data on UK video streaming habits to see why this matters.
When you change the resolution of a video, you are fundamentally altering its data structure. The goal is to provide enough bitrate for the new dimensions to look clean without wasting data, ensuring a smooth and high-quality viewing experience for your audience.
Common Questions About Changing Video Resolution
When you first dip your toes into changing a video's resolution, a few questions always pop up. Getting these sorted from the start will save you a world of frustration and help you avoid a grainy, disappointing export.
Can I Really Turn a 720p Video into 4K?
This is probably the biggest one we hear. Can you take an old 720p clip and make it look like it was shot in crisp, modern 4K? The short answer is yes, but how you do it matters immensely.
If you just drop it into standard editing software and change the resolution, you'll technically get a 4K file. But the result will be a blurry, stretched-out mess. Traditional software simply makes the existing pixels bigger to fill the new space; it doesn't add any genuine detail.
For a true quality boost, you need to look at AI upscaling. This is a completely different ball game. AI models analyse the image and intelligently create brand new pixels, adding real detail and sharpness. It’s the only way to get a genuinely good-looking 4K video from a lower-resolution source.
What’s the Deal with File Size?
Another common point of confusion is how changing the resolution impacts the final file size. It seems logical: smaller resolution, smaller file, right?
Generally, that's true. Downscaling a video—say, from 4K to 1080p—almost always results in a much smaller file because you're throwing away a massive amount of pixel data.
But it’s not the whole story. The final size is a delicate balance between resolution and bitrate. A low-resolution video with a needlessly high bitrate can still be a huge file. You have to tweak both settings to get the best balance of quality and size.
Think of it like this: Resolution is the size of your canvas, and bitrate is the amount of paint you're given. A huge canvas with a tiny bit of paint will look sparse and blocky. You need the right amount of paint for the size of your canvas.
What Resolution Should I Use for Social Media?
Finally, what’s the magic number for social media? It really depends on the platform, but for the vertical video world of TikTok, Instagram Reels, and YouTube Shorts, the gold standard is 1080x1920 pixels.
Sticking to this 9:16 aspect ratio ensures your video fills the entire screen on a mobile phone. This not only looks more professional but also stops the platform from awkwardly cropping your video and cutting off important parts of the action.
For a deeper dive into these topics and more, you can explore our comprehensive SoReel FAQ page.